
Facebook Page
Facebook is the most social media platforms and as an NGO you could reach many stakeholders through Facebook. In this guide, we will learn how to design a good organizational Facebook page specifically for an NGO in the migration space.
You could use the anchor on the right to jump directly to the desired section. This is a beginner guide Taylor-suit for an NGO in the migration space. If you already know the information of a particular section, please feel free to skip to the next section!
Preliminary step: Creating a Facebook Account
If your organization did not use Facebook for digital marketing before. Let's first create an Facebook account for your organization.
You many find the link to Facebook website here
To create an account, please press the green "Create New Account" button.

Once you click the button, you will see the sign up page as shown below. Please enter information in the corresponding box. Try not to use simple password as otherwise the Facebook will not let you go through.
After you finish entering the information, press the green "Sign Up" button that is circled in red.

If your password and username format satisfies the requirement, you will the go through verification step. Facebook will send you verification email or message depending on what you used to create this account.
You will be directed to your account's page once you pass the verification.
To continue to the next section, please take note of your account name and password and log out of your new account.
You may click your profile photo on the top right (for now just a gray photo since we haven't set up yet), and then select the last one of the drop-down list, which is "Log Out".

Step 1: Start creating a Facebook page!
Please visit the Facebook Login page by clicking here.
You will see the page below, and please do not directly log-in for now.
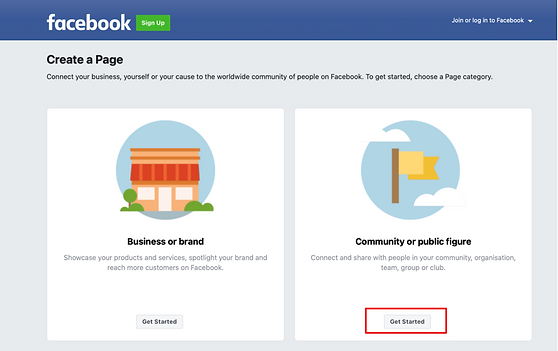
Below the log-in box there is a line of words, please click the bolded words "Create a Page".

Once you click on "Create a page", two options will be given to you. For NGOs, the option on the right is more appropriate of us. Please press the "Get Started" button of the second option to continue.
Facebook will then ask you to log-in. You could login to your organization's account you just created in the preliminary step or your existing account.

After logging in, you will see the below dashboard. This is for the initialization of your page. You could directly enter information on the left panel and the information will be shown in the corresponding section of your page.

Facebook will ask you to select the category of your page. You could type "NGO" and select the corresponding option in the drop-down list.
You could also enter some extra information to explain your page or your organization in the "Bio" section. This could be a short paragraph about your organization's mission, what you do and your organization's goals etc.
After you finish, you should see a green sign, which indicates that the information you entered is okay.
Lastly, click the blue "Create Page" button on the bottom of the left panel.

There are other steps for you to go through in order to finish setting up your page. The progress can also be seen on the left panel.
For example, the second step allows you to enter your organization's contact details, location, and operating hours. You could click on the "+" sign and then enter the information in the area expanded.

For "Hours" section you could select in the drop-down menu "at selected hours". This will allow you to fill in the operating hours of your organization, so that the potential stakeholders could contact you in a more appropriate time.
Remember to press "save" after you finish.

Please press "next" after you finish entering all information.
The third step is about decorating your page.
You could click on "Add Profile Picture" and "Add Cover Photo" to edit the corresponding visual sections. For profile picture, it is recommended to use your Company's logo. This way you are creating a general picture of your company.
Cover photo is the one that fills the space behind your profile picture. You could either find a cover photo or design your own. Some companies will choose to design the cover photo that has the right size and a blank space for the profile photo. Our ultimate goal is to design a nice-looking page that conveys our messages correctly.

There is also an option to add Action Buttons. Action buttons are those that allow the viewers to interact with your page or your organization. The two default ones are "Follow" and "Messages". You could select the ones you want to add by clicking the "Add Action Button" . Then, you will see the following page.

There are various options you can choose from depending on how you want the viewers to interact with you. This is a very precious opportunity as this builds up a bridge directly between you and the potential stakeholders.
We know that migrant domestic workers are more easily attracted to video content. You could link your Facebook page to a video by choosing the "Watch Now" action button. This is a nice way to convey your messages!
After you press "next", you will be asked to fill in a link to your video. This could be your YouTube video address ( If you have a YouTube account for your organization ).

Press next to continue to the next step as we did previously.
In this step you could connect this page to your WhatsApp number. This is recommended because WhatsApp gives you a direct opportunity to talk to potential stakeholders. We know from research that migrant domestic workers have a high penetration of mobile use and WhatsApp is a commonly used mobile messenger app. This means that using WhatsApp along with Facebook can potentially increase your chance of reaching more beneficiaries.

The next two steps are just a few tips. You could choose as you like.
Finally, we could press "Done" to finalize your initialization stage.

Step 2: Start your new post!
You will be directed to your page once you press "Done". A pop-up window will be shown to you. As we just started learning, you could choose "Take tour" to see what Facebook prepares for you!
Please note that your page can be treated as a separate profile from your account. It is therefore necessary to keep in mind how to switch between your account profile and page profile.

We could start from creating a welcome post. There are three things we want to do: attract people, engage with them and convert them. This means that it is important to highlight the work that your organization is doing. This way your followers can share your post and help spread your messages further.

You could write your post in the text box and you could also add some formatting to your words (color, style, background and special design).
Facebook also offers you a paid option called"Boost Post". This is more like an advertising function that allows you to target the audience based on features such as locations, gender and age. We will not go in depth about this functionality here, but you could investigate more if you are interested!

Once you finish editing, press "Post" to continue. Note that if you turn on the button for "Boost Post", you will be directed to another page for choosing the targeted audience and payment.
Developing an organization's page takes time and requires long-term strategies. Here are some useful tips that might be helpful in your early Facebook page development:
-
Ask all your staff and friends who have the interest to like your page. You could even ask your staff to invite their friends. This is an organic way to help your page grow.
-
Use hashtags is a good practice since many people do find things using hash tags. Hashtags are keywords that are relevant to your post, which start from a "#". For NGOs in the migration space, you could use "#migration" "#visa" and "employment". Please be careful not to use too many hashtags as this could make your post look scammy. Usually we recommend 1 to 3 hashtags.
-
Post consistently. For example, if you only post once a week please keep the posting date the consistent (eg. always on Saturday). This way your followers will get used to it so that they could better engage with you.
-
Create sharable content. This means contents such as infographics, funny memes that inform and inspire. When you provide these two elements, people are more likely to share your post. As a result, you will get more organic visibility.
This above example is for creating the first post. we created a post as part of the initialization stage. For doing your regular posting, you could find the post box in two places. In picture below, the home icon on the top directs you to a page where you can find the content that video recommends for you based on your past views/likes/engagements.
The home icon on the left panel directs you to the dashboard for editing the page.
The picture below is the dashboard and the textbook circled in purple is where you can post new posts. Please note that there are three options below the text box. Nowadays more advanced technology makes (live) streaming videos possible. People are usually more attracted to video and image content. Therefore, you could try using more videos and images as part of your regular posting!

The below picture shows you the home page that includes recommended content from Facebook. The text box used for posting could also be found on this page (circled in purple).

Facebook page helps you connect with stakeholders and raise awareness. Therefore, the content of your Facebook posts is crucial. We prepared some guides and tips to show you how to create nice Facebook posts for each of the following purposes.
Helpful note 1: Check Facebook insights
Facebook has a nice functionality that demonstrates some statistics about your page. This includes the number of post reach, post engagement, page likes and page followers. You could also see a break down analysis according to the types of interactions. We will briefly introduce how you could find these results.
Once you log-in to your account, you should see the page below. Please click the name on the top of the left-side panel to enter your page dashboard.

There are two ways to find Facebook insights. One way is to click the "Manage" button and the other way is to directly click on "Insights" in the left-side panel.

You will then enter the professional dashboard. On the left panel you can select the categories of insights you want to see. The break-down analysis of your page is mainly located in "Your page" section.

Helpful note 2: About meta business suite
Once your Facebook grew more popular and your stakeholder reach became larger, it could be difficult to manage everything (post regular, timely engagement with the followers etc.). You might need a useful tool to help you manage all those things and improve your management efficiency. Meta Business Suite is a good management tool that you should consider using. Especially when you also have an account in instagram and you want to make sure you post regularly and consistently on both social media platforms.
Click here foe the Meta Business website. Press "Get started"!

If you logged into your organization's account on your current device, you will be brought to the dashboard once you click "Get Started". In this section, we will talk about two of the most useful functionalities of Meta Business Suite: Reply to all messages in one place and schedule a post early.

As this is our first time using Meta Business Suite, the website has prepared us with a few tasks to help us get familiar with the functions of Meta Business Suite. On the top menu you can find the the sources of messages. You could select the source and reply to messages just in this dashboard. By using Meta Business Suite, it's less likely for you to miss a message.

You could also find this collection of messages in the left menu bar under "Inbox".

The next thing we want to talk about is scheduling a post. Sometimes we might not be able to finish the post before the deadline. Meta Business Suite can save us the trouble of chasing the deadline and write a post anytime we want. Once you click on "Schedule a post" or the calendar icon on the left menu bar, you will see the post dashboard below. Click "Schedule" once you finish.

You will first see a calendar with you event included. Choose the appropriate date and time to finish scheduling.
