

Wix
A commonly used website building and hosting platform.
With templates and drag-and-drop tools, Wix can help you build a websites without coding or design skills.
Here I would like to introduce the option that has a link icon (circled in purple). This option is for choosing the content that the button links to.

On the left (circled in red), you could select the type of item you want to link your button to.
For my example, what we expect usually is that we are brought to a page where we see the contact details of a company after clicking the “Contact Us” button. In this case, we could choose to link the button to a page.

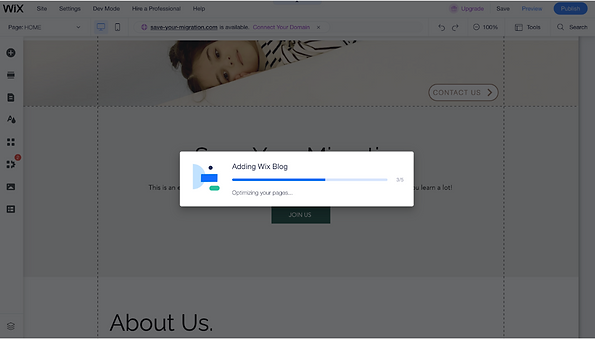
Step 5: Add a new page
Since I haven't created the contact page, I click the “Add New Page”. Please note that you could also add a page in advance by clicking the third button(counting from top to button) in the dashboard menu bar. Then, a new window for adding a new page (see picture below) will pop up. You could choose the template under each theme(circled in red)

For my example, I added one page from the “Contact” category. You might need to wait for a while for the page to load for you. After that, we can start editing your new page. Please notice that in the left top corner, you could click the arrow to see a drop-down list. This list shows you all the pages you have so far in your portfolio. You could click on any page to continue editing.
I will show you other functionalities in the next section.
Step 6: Customize color and text theme
So far we have seen how to add a section, an element, and a page. The next functionality we will see is “Color & Text Theme”. This section relates to how to balance colors and how to use color and text themes to support your underlying messages. You could try various options and choose the one that fits your organization’s purpose.

Step 7: Link social media account to your webpage
Having a good website and social media accounts are both important for optimal result of digital marketing. It is even more powerful if we could link these two together. In this section, we will learn how we can link our organizational social media accounts to our website using Wix.
The first thing we need to do is to find the social media button in the left-side menu bar and click on it

After you click on any social media icon, you will see the following page. Then press the light blue button to connect to your social media.

You will be directed to the social media sign-in page. You could sign in your organization’s account.

Wix has a broad range of functionalities that makes almost every part of your web page customizable. This way you could create your ideal website. This guide only covers the basic functionalities of Wix and gives you a detailed kick-start. If you find Wix helpful, you could investigate other functionalities such as advanced SEO and adding payment buttons.
The general guide ends here. Scroll down to read about useful information about how to make a good website for NGOs in the migration space!
Step 1: Create your Wix account
First of all, let’s go to the online platform by clicking here.

Once you click on the “get started” button, the site will take you to the sign-up page.

After you click add elements, you will see many categories. For example, you could add a button that brings visitors to a different page.

Step 2: Create your first website
After registration, you will be directed to the dashboard. This is our first time to visit the dashboard for our website. There is a separate dashboard for each website you created.
If you log-in to your account later on. You will see a page like this

You could click on any site in your account that you want to continue editing. For me I clicked on my site named “Save your migration”, and the following is the dashboard for this site. It’s nice to explore what you can do in the dashboard.

After you click add elements, you will see many categories. For example, you could add a button that brings visitors to a different page.
Step 3: Add a section to your website
In the image below, when you click “add sections”, you will be provided with themes of the section added. You could choose one according to the purpose of the section you add.

For the theme of this section, I chose “testimonial”, which gives me a clean and simple look. You can try every theme and see which one is the most suitable.
You can add as many sections as you want. These sections together make one website page. A clean and convenient design could make potential stakeholders stay longer on your site.
You could double click the section you just added and the textbox to change the content.

After you click "Add elements", you will see many categories. For example, you could add a button that brings visitors to a different page.
Step 4: Add an element to your website sections
If you move your mouse to the area above or below the section, Wix automatically gives you recommendations to add elements. Please note that to add elements, you could also click on the first button in the menu bar (circled in blue).

After you click add elements, you will see many categories. For example, you could add a button that brings visitors to a different page.
For the example over here, I added one strip which has a picture of a child, and then a button called “CONTACT US”. You could also double click on the element you added to change its design and features. Different elements have different features you can customize. For the button type of element, you will have a list of options after you double click it. You could move your mouse to each of the options (without clicking it), and the function name will appear on top. This way you can check what each option is for.

How to make a good NGO website ?
We've learnt about how to use Wix's various functionalities to produce a nice-looking website, but how can we make a good website specifically for us? You probably have read about the features that a good NGO website has, which are:
-
A mission statement, telling visitors what you’re all about.
-
Plenty of details on what you do and why it matters.
-
Headshots and bios for your organization’s key members, staff, or partners.
-
A blog or news section, to keep people apprised of the most recent updates and successes.
-
Contact information, so interested parties can get in touch.
-
Compelling imagery, incorporated throughout your site.
-
A Call To Action (CTA) prompting visitors to sign up for an email list, volunteer, donate, or do whatever matters most to your organization.
In this section, I will show you how to add each of the above to your website.
A mission statement
It is important to write your mission out in concise words and let website visitors know exactly what you want to achieve. You could also let them know why your mission is crucial or urgent. You should consider adding a section to your website exclusively for explaining your mission. Let's see a good example of this (website of Charity:Water)

As you can see from the image, Charity: Water makes it explicit that their mission is to end the water crisis. You could summarize your mission as a line of words and make it sound like a call to action. You could then use this sentence as the header but also explain it in more details in a paragraph below. A good practice here to note is than Charity:Water also quantified their achievements and list them on the list. This is a very nice way to let potential stakeholders understand the big impact you are making and increase the chance of connecting with them (e.g. donation).
In Wix, there are nice templates that could be found. You could click "Add Section" button and find the templates under "Testimonial".

A plenty of details about what you do and why it matters
We usually write in details about what we do in the "About Us" section of the website. This part is very important as potential stakeholders need a clear image about what you do before they connect with you. You could design a whole page to write about this. Let's see an example below from the website of Central Park Conservancy. You could consider summarizing the projects you are currently working on and also the stories about your organization and the beneficiaries you helped. These project descriptions and stories give your stakeholders a much better and clearer idea about the things you do. Adding these elements in column format (as shown below) is a very nice style. You should also consider adding compelling imaged (those that create a strong impression among people).
Click here to have a closer look of the "About Us" page of Central Park Conservancy.

Summarizing values of your organization is also a good way to empathize with stakeholder. Values are the beliefs that motivate people to act in a certain way and potential donors who share the same or similar values as you are more likely to take an action (donate).

Headshots and bios for key member, staff or partners
Besides writing clearly about what you do and why it matters, you should also add headshots and bios for your organization's key members, staff or partners to your "About Ud" page. This could shorten the distance between you and your stakeholders. The facial expressions of your photos are crucial. A warm and professional smile could create a more comfortable environment and make you look approachable to your potential stakeholders. See the example from Charity:Water
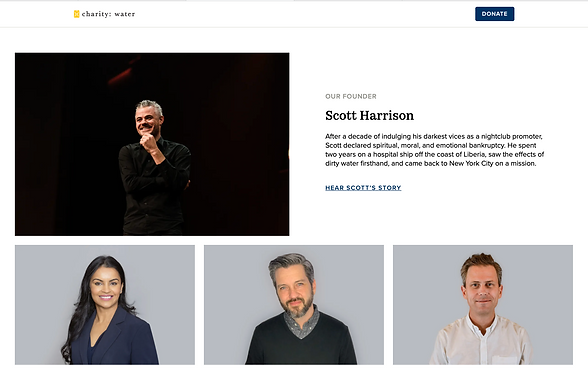
In Wix, you could find well-designed templates for a new "About Us" page. They could be found in the "About" section after you click the "Add page" button.

A blog or news section
Being active all the time and keep updating what you do with the stakeholders can help your organization stabilize or continuously grow. You could consider adding a blog or a news section to your website. A blog is something that changes on a regular basis. You could designate an entire page to your blog/news. For example, the website of Central Park Conservancy has a page called "Magazine" and put it the menu bar on top. This is also a nice thing to do as people could find your blog directly when they visit your website for the second time onwards.
Click here to have a closer look of the news/blog page of Central Park Conservancy.


Sometimes you may want to view blog reports. This gives you insights about your blog, which could be useful for developing improvement strategies and understanding your audience.

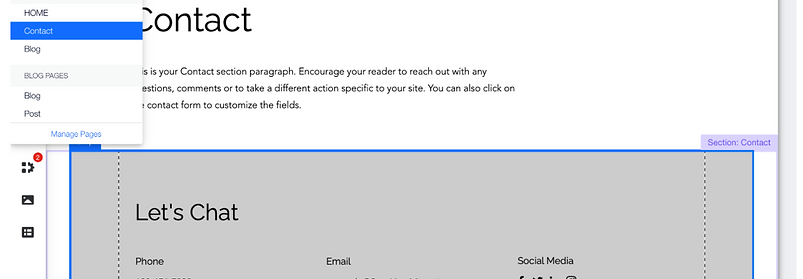
A nice contact page
An easy-to-find contact page with your contact details clearly written is a must for you website. There are many nice templates in Wix for your contact page. You should also make sure that your contact page can be accessed from the menu bar on top. This is a common design so that people are used to it.


Adding a Call To Action Button
You perhaps have already noticed in the examples we before, they all have a call to action button. This could be a "Donate" button for Charity:Water, and a "Join/Renew" button for Central Park Conservancy.
Let's see how we do this in Wix!
Wix allows us to add buttons for various purposes. For a donate button, simply go for "Add Elements" -> "Button" -> "Pay Buttons".

Once the button has been added to your page, you could move it to the desired area. Call to action button is usually placed on the top right. Following the common way could make viewers feel more familiar and they don't have to worry about finding this button.
Click on the button to edit its name and see the "Manage Payment Methods" button.

You will see the payment dashboard below after you click "Manage Payment Option". You could choose the most appropriate payment options. Usually Stripe and PayPal combined would be sufficient for modern online payment.

For demonstration, I chose to connect the Stripe method. Scroll down to the end of the page to find the "Connect Button"

There are many steps in adding a payment because you need to enter very important payment details. Please take your time, read instructions carefully and fill in the information accordingly.


A Call to action button could also be asking viewers to subscribe to your blog or potential volunteers/employee to join your organization. For this you could design an appropriate text button and link that button to a sign-up form. For sign up form you could add a form to your contact page. To find the form and add it as an element to your page, go for: "Add Elements" -> "Contact & Forms" (see the second image below).


Some useful resources for how to use Wix
-
Wix Tutorial for Beginners (video): https://www.youtube.com/watch?v=nIKbN5pBSXo
-
Wix Tutorial (article): https://www.tooltester.com/en/blog/wix-tutorial/
-
How to make a Wix website (article): https://themeisle.com/blog/make-a-website-with-wix/
-
How to create a website using Wix (article): https://www.designbombs.com/create-a-website-using-wix/